Second Franco-Dahomean War
| Second Franco-Dahomean War | |||||||
|---|---|---|---|---|---|---|---|
| Part of the Scramble for Africa | |||||||
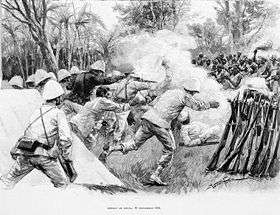 Battle of Dogba, 19 September 1892 | |||||||
| |||||||
| Belligerents | |||||||
|
|
| ||||||
| Commanders and leaders | |||||||
|
|
| ||||||
| Strength | |||||||
|
8,800 Dahomey Regulars 1,200 Dahomey Amazons |
2,164 French soldiers 2,600 Porto-Novo porters | ||||||
| Casualties and losses | |||||||
|
2,000–4,000 combat deaths over 3,000 wounded |
85 combat deaths 440 wounded 205 disease deaths | ||||||
Part of a series on the |
|---|
| History of Benin |
 |
|
|
The Second Franco-Dahomean War, which raged from 1892 to 1894, was a major conflict between the French Third Republic, led by General Alfred-Amédée Dodds, and the Kingdom of Dahomey under King Béhanzin. The French emerged triumphant and incorporated Dahomey into their growing colonial territory of French West Africa.
Background
In 1890, the Fon kingdom of Dahomey and the French Third Republic had gone to war in what was remembered as the First Franco-Dahomean War over the former's rights to certain territories, specifically those in the Ouémé Valley.[1] The Fon ceased hostilities with the French after two military defeats, withdrawing their forces and signing a treaty conceding to all of France's demands.[2] However, Dahomey remained a potent force in the area and quickly re-armed with modern weapons in anticipation of a second, decisive conflict.
Casus belli
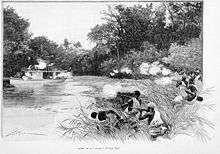
After re-arming and regrouping, the Fon returned to raiding the Ouémé Valley,[3] the same valley fought over in the first war with France. Victor Ballot, the French Resident at Porto-Novo, was sent via gunboat upriver to investigate.[4] His ship was attacked and forced to depart with five men wounded in the incident.[4] King Benhanzin rejected complaints by the French, and war was declared immediately by the French.[4]
Military build up
The French entrusted the war effort against Dahomey to Alfred-Amédée Dodds, an octoroon colonel of the Troupes de marine from Senegal.[4] Colonel Dodds arrived with a force of 2,164 men including Foreign Legionnaires, marines, engineers, artillery and Senegalese cavalry known as spahis plus the trusted tirailleurs.[4] These forces were armed with the new Lebel rifles, which would prove decisive in the coming battle.[5] The French protectorate kingdom of Porto-Novo also added some 2,600 porters to aid in the fight.[6]
The Fon, prior to the outbreak of the second war, had stockpiled between 4,000 and 6,000 rifles including Mannlicher and Winchester carbines.[7] These were purchased from German merchants via the port of Whydah.[7] King Béhanzin also bought some machine-guns and Krupp cannons, but it is unknown (and unlikely) that these were ever put to use.[7]
Beginning of hostilities
On June 15, 1892, the French blockaded Dahomey's coast to prevent any further arms sales.[6] Then, on July 4, the first shots of the war were fired from French gunboats with the shelling of several villages along the lower Ouémé Valley.[6] The carefully organized French army began moving inland in mid-August toward their final destination of the Dahomey capital of Abomey.[6]
Battle of Dogba
The French invasion force assembled at the village of Dogba on September 14, some 50 miles upriver on the border of Dahomey and Porto-Novo.[6] At around 5 a.m. on September 19, the French force was attacked by the army of Dahomey.[6] The Fon broke off the attack after three to four hours of relentless fighting, characterized by repeated attempts by the Fon for melee combat.[8] Hundreds of Fon were left dead on the field with the French forces suffering only five dead.[8]
Battle of Poguessa
The French forces moved another 15 miles upriver before turning west in the direction of Abomey.[5] On October 4, the French column was attacked at Poguessa (also known as Pokissa or Kpokissa) by Fon forces under the command of King Béhanzin himself.[5] The Fon staged several fierce charges over two to three hours that all failed against the 20-inch bayonets of the French.[5] The Dahomey army left the field in defeat losing some 200 soldiers.[9] The French carried the day with only 42 casualties.[9] The Dahomey Amazons were also conspicuous in the battle.
Trek to Abomey
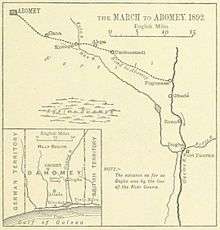
After the hard-fought victory at Poguessa, the Fon resorted to guerilla tactics rather than set-piece engagements. It took the French invasion force a month to march the 25 miles between Poguessa and the last major battle at Cana just outside Abomey.[9] The Fon dug foxholes and trenches in their desperate battle to slow the French invasion.[9]
Battle of Adégon
On October 6, the French had another major encounter with the Fon at the village of Adégon.[10] The Fon, again, fared badly, losing 86 Dahomey Regulars and 417 Dahomey Amazons.[10] The French suffered six dead and another 32 wounded before the fighting was ended.[10] The French made use of a bayonet charge, which inflicted the lion's share of Dahomey's casualties.[10] The Battle was a turning point in the mind of Dahomey. The royal court decided that there would be no victory for Dahomey.[10] The battle was also significant in that much of Dahomey's Amazon corps was lost in the engagement.[10]
Siege at Akpa
The French column was able to cross another 15 miles toward Abomey after Adégon, bivouacking at the village of Akpa.[10] From the moment they arrived, they were attacked daily.[10] From the French arrival until October 14, Dahomey's Amazons were conspicuously absent from the fighting. Then, on the 15th, they reappear in nearly every later engagement inflicting significant losses especially against officers.[10] Once resupplied, the French left Akpa on October 26 toward the village of Cotopa.[11]
End of Dahomey
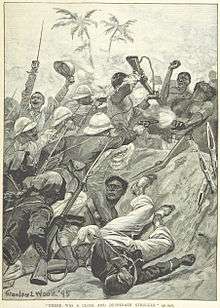
From October 26 to 27, the French fought through the Dahomey forces at Cotopa and elsewhere, crossing lines of enemy trenches.[11] Bayonet charges were the deciding factor in nearly all engagements. The Fon penchant for hand-to-hand fighting left them at a disadvantage against French bayonets, which easily outreatched Dahomey's swords and machetes.[11] The Amazons are reported by the French to have fought the hardest, charging out of their trenches but to no avail.[11]
Battle of Cana
From November 2 until November 4, the French and Fon armies fought on the outskirts of Cana.[11] By this time, Béhanzin's army numbered no more than 1,500 including slaves and pardoned convicts.[11] On November 3, the king directed the attack on the French bivouac.[11] Amazons seemed to have made up much of the force. After four hours of desperate combat, the Fon army withdrew.[11] The fighting continued until the fourth.
The last engagement at Cana, which took place at the village of Diokoué, site of a royal palace, was the last time Amazons would be used.[12] Special units of the Amazons were assigned specifically to target French officers.[12] After a full day of fighting, the French overran the Dahomey army with another bayonet charge.[12]
End of the war
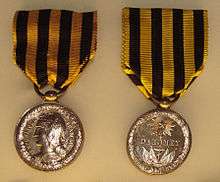
On November 5, Dahomey sent a truce mission to the French, and the next day saw the French enter Cana.[12] The peace mission failed, however, and on the 16th of November, the French army marched on Abomey.[12] King Béhanzin, refusing to let the capital fall into enemy hands, burned and evacuated the city.[12] He and the remnants of the Dahomey army fled north as the French entered the capital on November 17.[12] The French tricolor was hoisted over the Singboji palace, which survived the fire and remains in modern Benin to this day.[13]
The king of Dahomey fled to Atcheribé, thirty miles north of the capital.[13] Attempts were initiated to rebuilt the army and its amazon corps until the French chose Béhanzin's brother, Goutchili, as the new king.[13] King Béhanzin surrendered to the French on January 15, 1894 and was exiled to Martinique.[13] The war had officially ended.
See also
Notes
- ↑ Alpern, p. 193.
- ↑ Alpern, p. 196.
- ↑ Alpern, p. 21.
- 1 2 3 4 5 Alpern, p. 198.
- 1 2 3 4 Alpern, p. 201.
- 1 2 3 4 5 6 Alpern, p. 199.
- 1 2 3 Alpern, p. 197.
- 1 2 Alpern, p. 200.
- 1 2 3 4 Alpern, p. 202.
- 1 2 3 4 5 6 7 8 9 Alpern, p. 203.
- 1 2 3 4 5 6 7 8 Alpern, p. 204.
- 1 2 3 4 5 6 7 Alpern, p. 205.
- 1 2 3 4 Alpern, p. 206.
References
- Roques, Pierre Auguste (1895). Le Génie au Dahomey en 1892 … Avec une carte. Extrait de la Revue du Génie militaire. BERGER-LEVRAULT & Co. - British Library, Digital item viewer
- Alpern, Stanley B. (1998). Amazons of Black Sparta: The women Warriors of Dahomey. New York University Press.