Tool wear
Tool wear describes the gradual failure of cutting tools due to regular operation. It is a term often associated with tipped tools, tool bits, or drill bits that are used with machine tools.
Types of wear include:
- flank wear in which the portion of the tool in contact with the finished part erodes. Can be described using the Tool Life Expectancy equation.
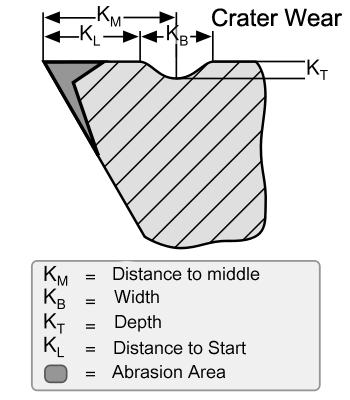
- crater wear in which contact with chips erodes the rake face. This is somewhat normal for tool wear, and does not seriously degrade the use of a tool until it becomes serious enough to cause a cutting edge failure.
Can be caused by spindle speed that is too low or a feed rate that is too high. In orthogonal cutting this typically occurs where the tool temperature is highest. Crater wear occurs approximately at a height equaling the cutting depth of the material. Crater wear depth ~ t0 t0= cutting depth
- built-up edge in which material being machined builds up on the cutting edge. Some materials (notably aluminum and copper) have a tendency to anneal themselves to the cutting edge of a tool. It occurs most frequently on softer metals, with a lower melting point. It can be prevented by increasing cutting speeds and using lubricant. When drilling it can be noticed as alternating dark and shiny rings.
- glazing occurs on grinding wheels, and occurs when the exposed abrasive becomes dulled. It is noticeable as a shine while the wheel is in motion.
- edge wear, in drills, refers to wear to the outer edge of a drill bit around the cutting face caused by excessive cutting speed. It extends down the drill flutes, and requires a large volume of material to be removed from the drill bit before it can be corrected.

Effects of Tool Wear
Some General effects of tool wear include:
- increased cutting forces
- increased cutting temperatures
- poor surface finish
- decreased accuracy of finished part
- May lead to tool breakage
- Causes change in tool geometry
Reduction in tool wear can be accomplished by using lubricants and coolants while machining. These reduce friction and temperature, thus reducing the tool wear.
A more general form of the equation is
where
- =cutting speed
- T=tool life
- D=depth of cut
- S=feed rate
- x and y are determined experimentally
- n and C are constants found by experimentation or published data; they are properties of tool material, workpiece and feed rate.
Temperature Considerations

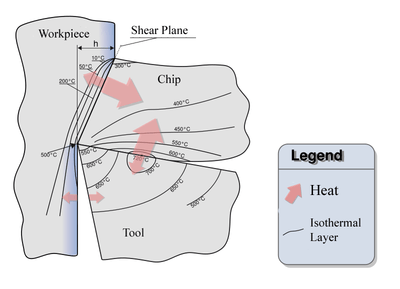
At high temperature zones crater wear occurs. The highest temperature of the tool can exceed 700 °C and occurs at the rake face whereas the lowest temperature can be 500 °C or lower depending on the tool...
Energy Considerations
Energy comes in the form of heat from tool friction. It is a reasonable assumption that 80% of energy from cutting is carried away in the chip. If not for this the workpiece and the tool would be much hotter than what is experienced. The tool and the workpiece each carry approximately 10% of the energy. The percent of energy carried away in the chip increases as the speed of the cutting operation increases. This somewhat offsets the tool wear from increased cutting speeds. In fact, if not for the energy taken away in the chip increasing as cutting speed is increased; the tool would wear more quickly than is found.
Multi-Criteria of Machining Operation
Malakooti and Deviprasad (1989) introduced the multi-criteria metal cutting problem where the criteria could be cost per part,production time per part, and quality of surface. Also, Malakooti et al. (1990) proposed a method to rank the materials in terms of machinability. Malakooti (2013) presents comprehensive discussion about tool life and its multi-criteria problem. As as example objectives can be minimizing of Total cost (which can be measured by the total cost of replacing all tools during a production period), maximizing of Productivity (which can be measured by the total number of parts produced per period), and maximizing of quality of cutting.
See also
References
- Malakooti, B; Deviprasad, J (1989). "An Interactive Multiple Criteria Approach for Parameter Selection in Metal Cutting". Operations Research 37 (5): 805-818.
- S. Kalpakjian and S.R. Schmidt. Manufacturing Engineering and Technology. 2000, Prentice Hall, Upper Saddle River, NJ.
- S. Kalpakjian and S.R. Schmidt. Manufacturing Processes for Engineering Materials. 2002, Prentice Hall, Upper Saddle River, NJ.
- K. Kadirgama et al. 2011, "Tool Life and Wear Mechanism" "http://umpir.ump.edu.my/2230/"
- Malakooti, B. (2013). Operations and Production Systems with Multiple Objectives. John Wiley & Sons
- Malakooti, B., Wang, J., & Tandler, E. C. (1990). "A sensor-based accelerated approach for multi-attribute machinability and tool life evaluation".The International Journal of Production Research, 28(12), 2373-2392.
External links
- Tool Wear Prediction and Verification in Orthogonal Cutting
- Manufacturing Process Educational Website
- Information Page on Gundrilling tool wear
- Study of tool wear and surface roughness in machining of homogenised SiC-p reinforced aluminium metal matrix composite